Encode Documents
Encoding a diary, survey, or quiz means using PaperStream to detect any pen marks on the pages of these documents and transfer them to a CSV file that you can use in Excel, SPSS, or R. PaperStream will compare a template (one page of one of your documents without pen or pencil marks) to each page answered by participants. Using a Marking Rubric (which I explain how to create below), PaperStream will detect and encode correct, missing, and duplicate answers.
Overview
- Scan an empty page of the documents as an encoding template
- Scan the answered documents
- Load the encoding template and scanned documents into Paperstream
- Create the marking rubric
- Encode and download the answers
Detailed Instructions
1. Scan an empty page of the documents as an encoding template
The encoding template is a page of a scanned document without pen or pencil marks. PaperStream will encode any answers on the scanned documents by comparing every page against this encoding template. You need to scan such template as a PNG or TIF file.
There are only two requirements for the encoding template:
- It needs to be a black and white PNG file or a grey scale TIF file (this is configurable on almost all scanner machines)
- You need to use ONE page of any scanned document without pen marks. Do not use the PDF template that you used to create the original documents because we need the four corner marks that are added to each page when you created your booklets (see a template in the EXAMPLE panel below).
2. Scan the answered documents
As with the encoding template, you can scan your diaries, surveys, or quizzes in PNG or TIF format. I recommend PNG as the process is easier but below you can find instructions for both options in case you need them.
Scan answered documents as PNG files (Recommended)
Scan every page of your documents as black and white PNG images with the bulk feeder of a photocopier/scanner machine (you can also scan one page at a time manually, but this will take more time). Finally, put the pages of each document in a zip file like this one. When encoding, PaperStream will order the pages alphabetically. At the end of this step, you should have a zip file per diary, survey, or quiz that you want to encode.
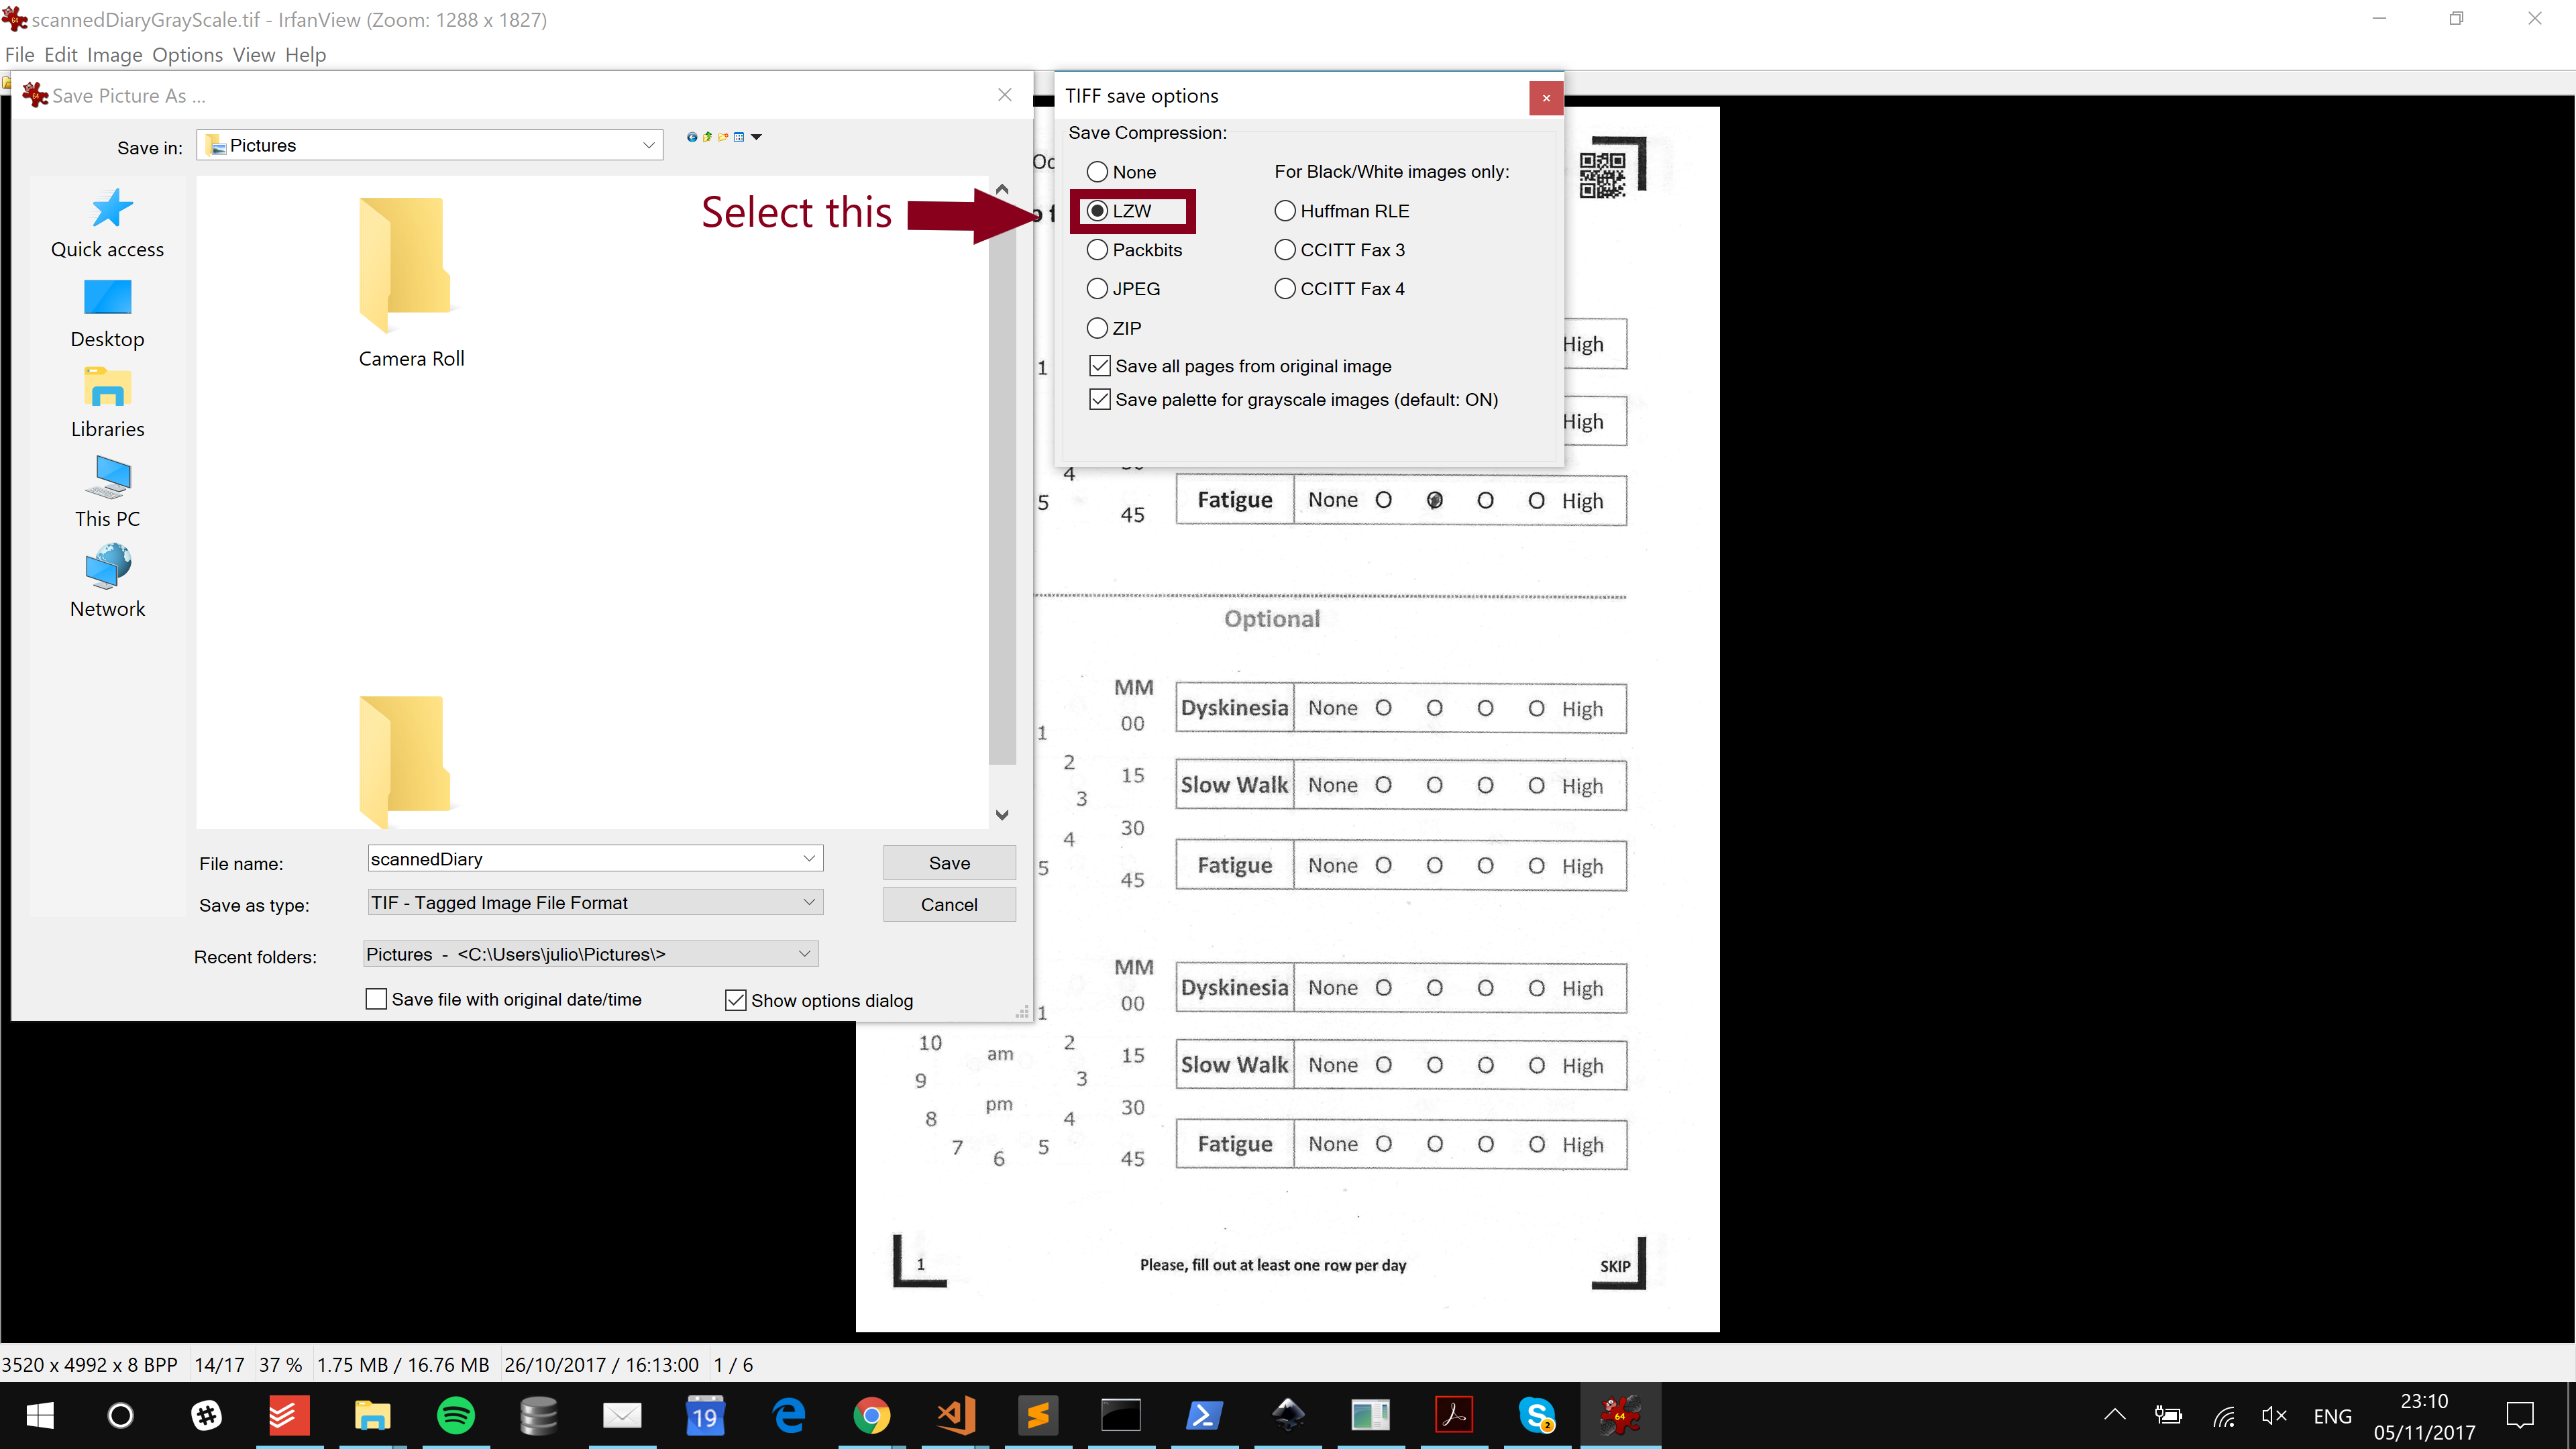 Irfan software. Changing a TIF image’s compression
3. Load the encoding template and scanned documents into Paperstream
Now that we have prepared the encoding template and the scanned documents, we can open PaperStream. We will work with the right panel “Encode paper documents” (see figure below).
- Load the encoding template by clicking “Load Template” (you can only load one template at a time).
- Load the scanned documents by clicking “Load Documents” (you can load as many as you want).
When everything is ready, click “Go to Encode Documents”.
 Encode Diaries page
4. Create the marking rubric
This step will take a bit longer than the others, but you only need to do it once if all your diaries, surveys, or quizzes have the same layout. Before I show you how you can create a marking rubric in PaperStream, I’ll introduce the concepts of Marking Rubric, Entry, Answer Space, Variable, and Value.
A Marking Rubric is the way PaperStream knows what sections of a page are areas where a participant can answer a question and also the meaning of those answers to the researcher.
- Entries. A rubric can have one or more Entries, think of them as rows (dotted red rectangles in the image below).
- Answer Spaces. Each Entry can have one or more Answer Spaces (red circles with blue border).
- Variable. Each Answer Space has a Variable, think of it as a label for what that Answer Space represents. For example hour of the day, minutes, the severity of a symptom, etc.
- Value Each Answer Space also has a Value that represents a specific “quantity”. For example, if the variable is “hour of the day” possible values are 1, 2, 3, …, 23, 24. This means that in any single Entry, one or more Answer Spaces can belong to the same Variable (hour of the day) but each one of them needs to have a different Value (1 to 24).
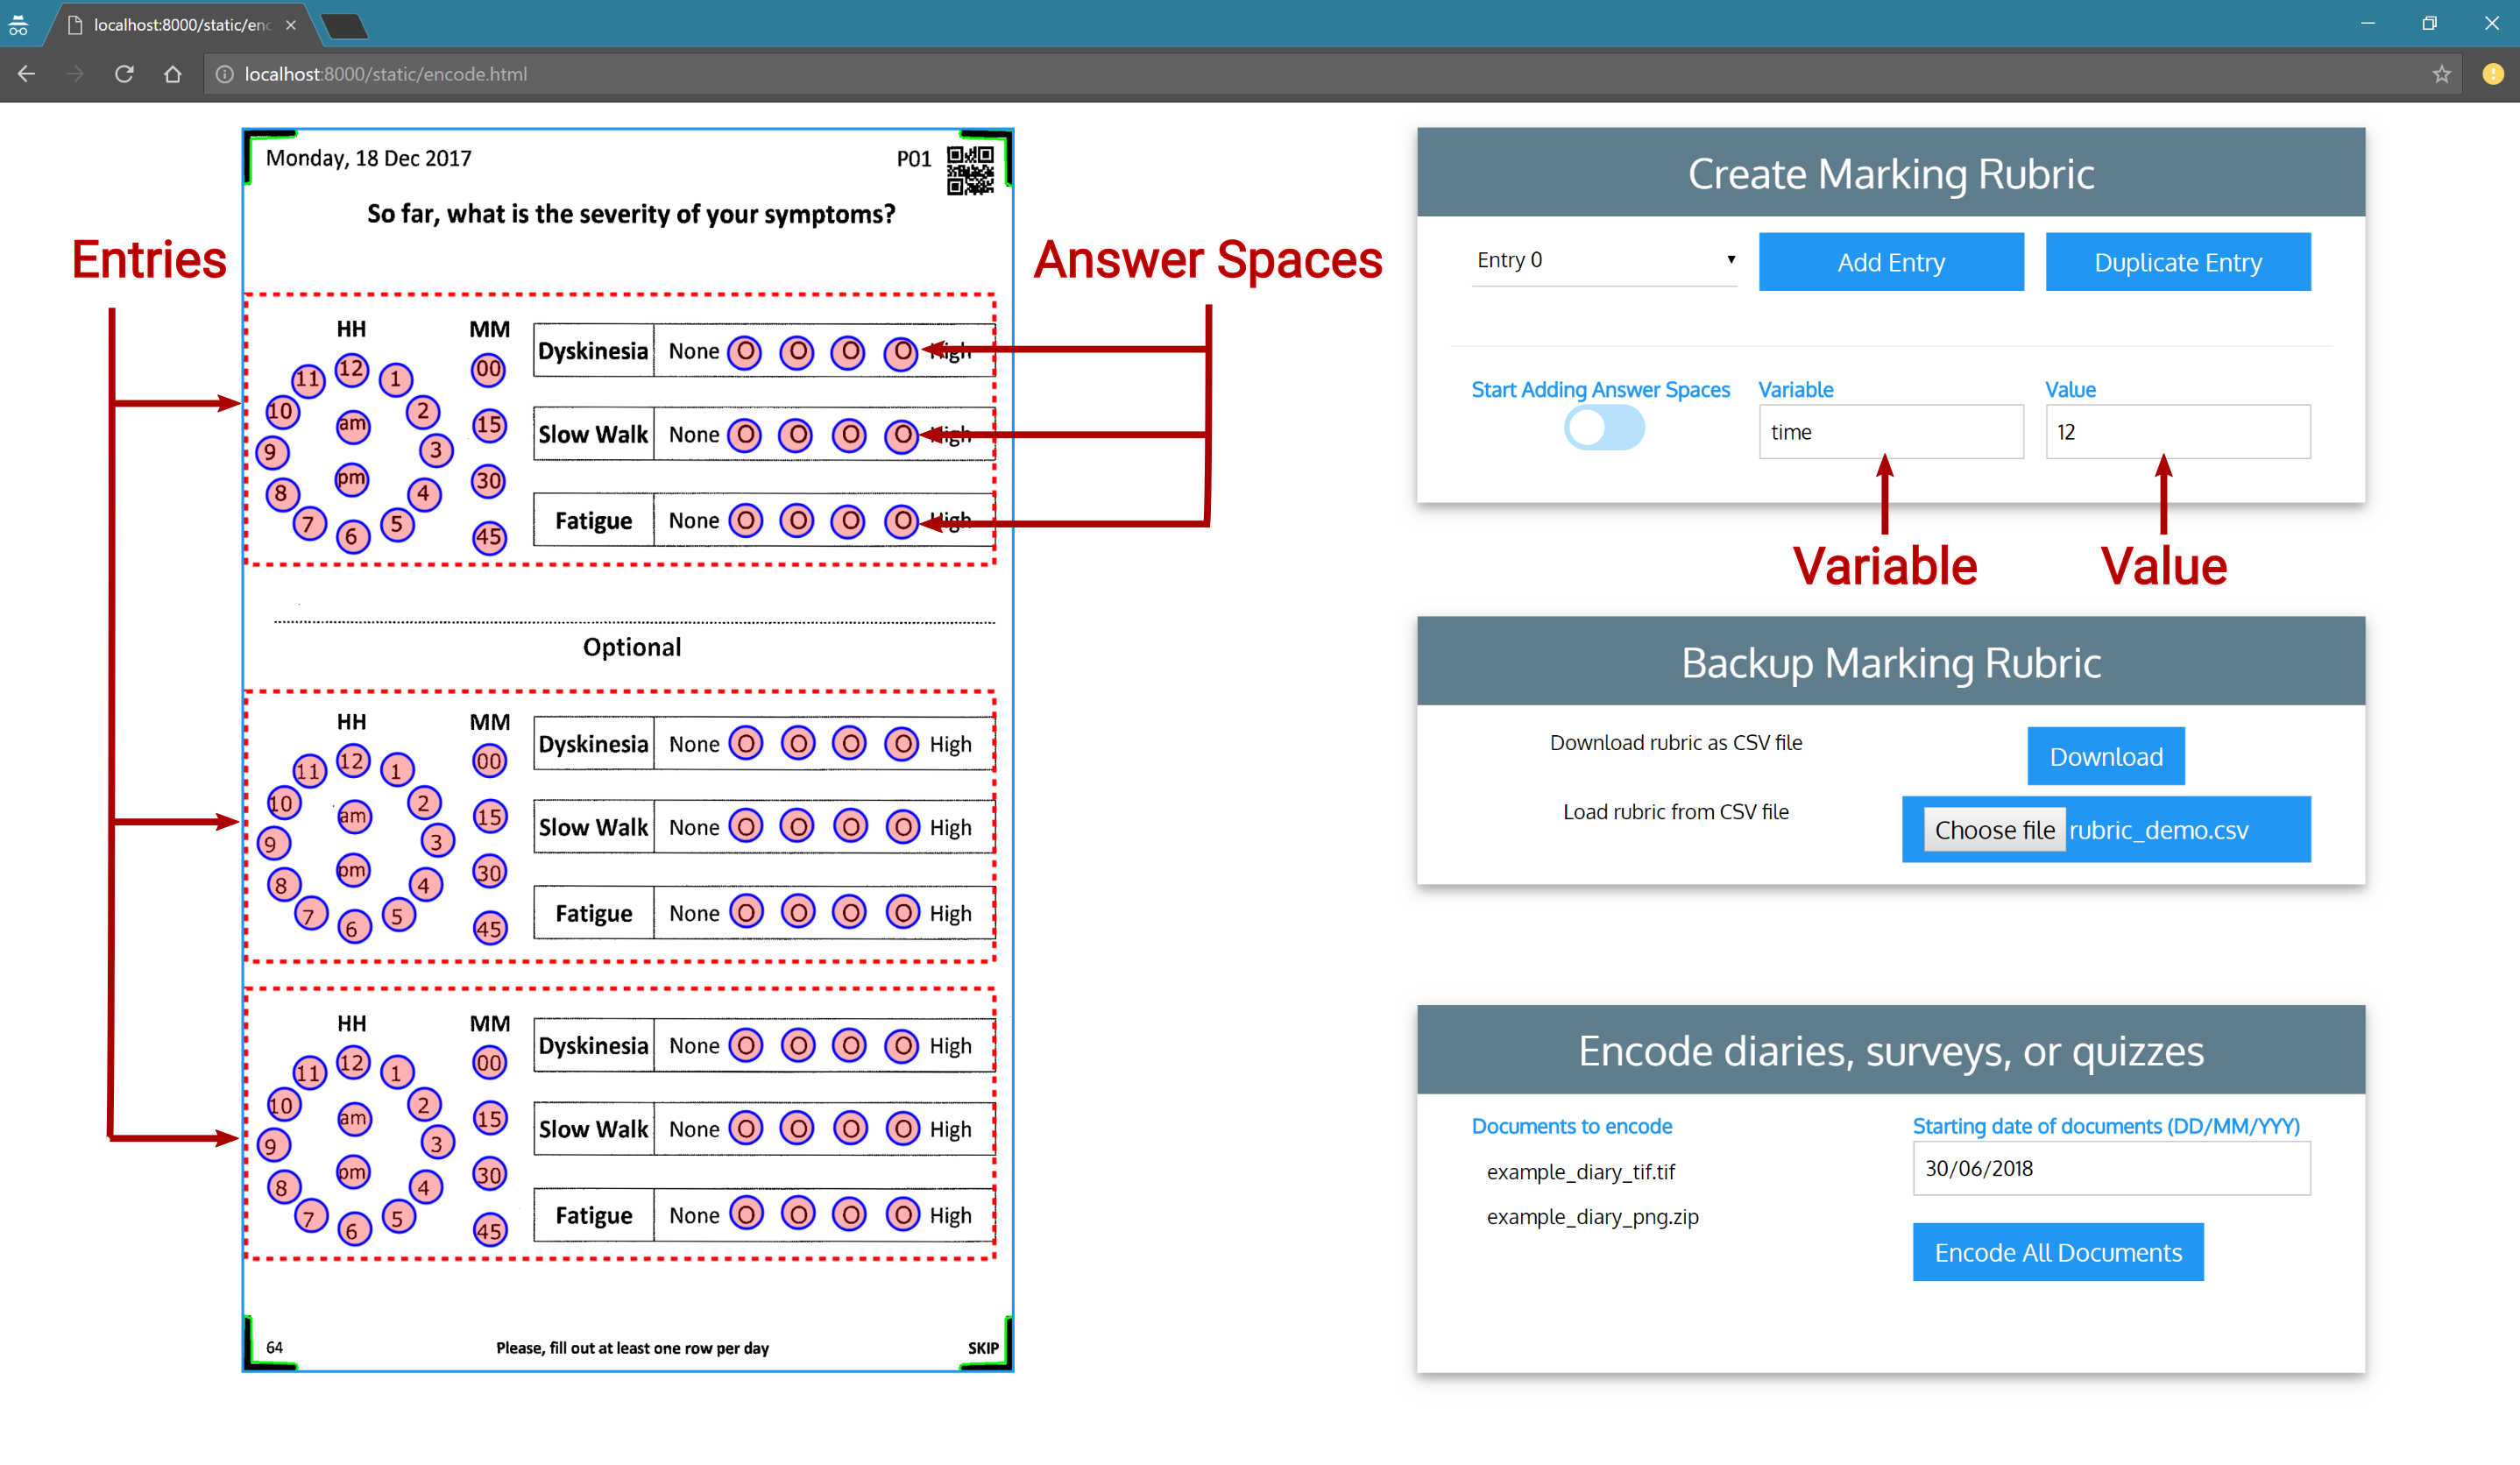 Creating the marking rubric
To create a rubric follow these steps:
- Click “Add Entry” to add as many entries as you need
- Activate the “Start Adding Answer Spaces” switch
- Type the Variable and Value for the new Answer Space
- Click anywhere on any Entry to add the new Answer Space and drag it around to its correct position. You cannot have an Answer Space with the same Variable and Value in the same Entry.
- When you are done, deactivate the “Stop Adding Answer Spaces” switch
Once you are happy with the rubric, you can back it up using the button “Download” in the “Backup Marking Rubric” card.
5. Encode and download the answers
When you finish the rubric, you can type in the date of the first page of your documents in “Starting date of documents” textbox (this is optional and only relevant if you are working with diaries). This will be an extra column in the final CSV file where each page will be assigned a day starting from the date you typed in. If you are not interested in time, you can leave the default value (today’s date).
Once everything is ready, click the button “Encode Documents”. When PaperStream finishes processing each scanned document, you will get a zip file called answers.zip with a CSV file per document. Be patient as this can take a few minutes.
Congrats! You have extracted all the answers from paper to a digital file.